This week's tutorial is on how to make gel letters/text. To learn how to do this, download the PDF. Have a blast!!!
Tuesday, August 26, 2008

Monday, August 25, 2008
Keeping Your Computer Safe - Part 2
Last time we talked about keeping your computer safe with Firewalls. Today we will discuss Internet Options and Automatic Updates.
Let’s start with Automatic Updates. It is important to have Automatic Updates turned on. I’ll show you how it’s done. First, click on Start, then on Control Panel. Once there, click on Security Center. This is the screen that pops up.

If your Automatic Updates are turned off, like in the picture above, just click on the Turn on Automatic Updates button to turn them on. Then, you want to check on your settings, so click on the Automatic Updates link on the bottom of the page. This screen will pop up.

You can choose for yourself which setting you would like it to be on. Personally, I like the Notify me but don’t automatically download or install them. That way it doesn’t slow my computer down when it automatically downloads and installs updates. I can choose when I want to download and install them.
Now, let’s talk about Internet Options. While still in your Security Center, click on the Internet Options link at the bottom. A screen like this will pop up.

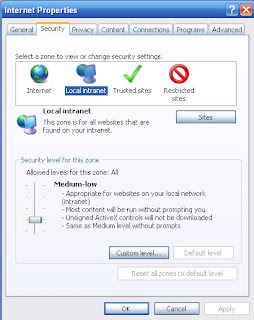
We’ll just be talking about the Security and Privacy tabs today. You want to adjust your security levels for each of the zones, Internet, Local Intranet, Trusted Sites, and Restricted Sites. The security level you set them at is up to you, but I will share with you what I like mine to be set at. So here, for the Internet, I like mine set on Medium-high. For Local Intranet, Medium-low:
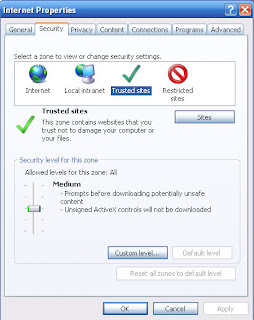
For Trusted sites, Medium:
And for Restricted Site, High:

Let’s move on to the Privacy tab. My preferred setting is at Medium with the Pop-Up Blocker turned on.

Now, let’s talk about Internet Options. While still in your Security Center, click on the Internet Options link at the bottom. A screen like this will pop up.

We’ll just be talking about the Security and Privacy tabs today. You want to adjust your security levels for each of the zones, Internet, Local Intranet, Trusted Sites, and Restricted Sites. The security level you set them at is up to you, but I will share with you what I like mine to be set at. So here, for the Internet, I like mine set on Medium-high. For Local Intranet, Medium-low:

For Trusted sites, Medium:

And for Restricted Site, High:

Let’s move on to the Privacy tab. My preferred setting is at Medium with the Pop-Up Blocker turned on.

This concludes this part in Keeping Your Computer Safe. Remember, it is up to you where you want to set your security levels at, I am merely making suggestions here. But, it is important to get to know these security measures on your computer. Also, remember to continually update your computer and software. This will keep your computer running smoothly and keep it protected.
Friday, August 22, 2008
Friday Freebie
My kids started school on Wednesday, two days ago, so I felt it was only appropriate that this Friday Freebie be something related to school. So, I made this Quickpage for you're enjoyment.

Tuesday, August 19, 2008
Tutorial Tuesday
This weeks tutorial is down to the basics, resizing. It's fairly simple, but an invaluable one if you're just starting out. Download the PDF file and go crazy!

Monday, August 18, 2008
Keeping Your Computer Safe - Part 1
I want this blog to be educational not always fun and games with digital scrapping. In a several part series, I would like to share my tips with you on how to keep your computer safe and how to keep your computer maintained and running smoothly.
As digital scrappers, everything we do is on our computers. It makes perfect sense to protect our computers and what is on them. So, this first part in our series, I will be sharing with you tips on how to keep your computer safe with Firewalls.
What is a Firewall? Simply put, a Firewall is a barrier keeping harmful things away from your computer. The Firewall filters information coming into your computer from your Internet connection. A Firewall can come in the form of a software program or a hardware device.
My personal philosophy is you can’t have too many Firewalls in place for your computer. This is precious information that we’re holding on our hard drives - pictures, memories, etc. We don’t want them vulnerable to outside forces.
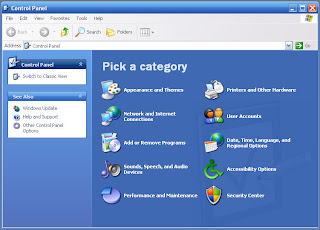
A Firewall that is automatically given to us is provided by Windows. To check to see if your computer is protected by this Firewall, first go to your Control Panel by clicking on your Start button.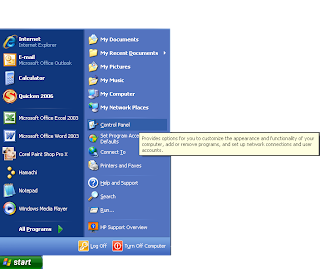
As digital scrappers, everything we do is on our computers. It makes perfect sense to protect our computers and what is on them. So, this first part in our series, I will be sharing with you tips on how to keep your computer safe with Firewalls.
What is a Firewall? Simply put, a Firewall is a barrier keeping harmful things away from your computer. The Firewall filters information coming into your computer from your Internet connection. A Firewall can come in the form of a software program or a hardware device.
My personal philosophy is you can’t have too many Firewalls in place for your computer. This is precious information that we’re holding on our hard drives - pictures, memories, etc. We don’t want them vulnerable to outside forces.
A Firewall that is automatically given to us is provided by Windows. To check to see if your computer is protected by this Firewall, first go to your Control Panel by clicking on your Start button.

Then this screen will pop up or something like it depending on your version of Windows. I’m using Windows XP.

Then we want to click on Security Center, which will lead us to a screen similar to this:


Click on the Windows Firewall, and you will see something like this:
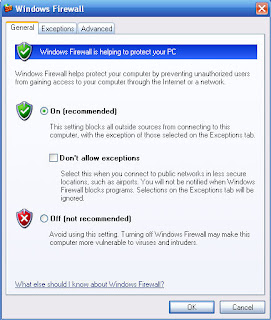
You want to have the On circle checked, and you are protected. Now, I won’t get into here, because it would take too long, but there are exceptions that need to be made for the Firewall. Such as some programs, that are installed on your computer, might need to gain access through the Firewall in order to connect with the Internet for them to work or just to update. I would suggest talking with a professional about how to set these exceptions up.
On to more Firewalls. There are some software programs that you can add in order to make your computer barrier stronger. I really like Comodo. You can even download their Firewall Pro for free here. Also, if you add a router to your home network, the router can come with a Firewall of its own. Linksys has some really great routers for excellent prices. You can visit their website here.
Okay, I think that’s about all for Firewalls. There’s actually much, much more to them, but I just wanted to touch on the subject and make you aware of why it is a good idea to have them in place, and give suggestions on what to use. Do your research, and always seek the advice of a professional as working with Firewalls can be complicated.
Friday, August 15, 2008
Friday Freebie
It's Friday, so that means FREEBIE time!!! Now that we're getting to the end of summer, it's time to make all of those summer layouts that we haven't had time for. I know I am soooo behind on my summer layouts. This freebie was inspired by my son's pictures that he took at Scout Camp. He had some friends of his take his picture while on the beach at Bear Lake. This is an element pack comprised of some fun items seen at the beach.
 This Element Pack consists of:
3 Sand Glitters
3 Felt Animals
DOWNLOAD HERE
Tuesday, August 12, 2008
Tutorial Tuesday
Today's tutorial is how to get a realistic looking paperclip onto a digital layout. Because there are so many pictures, you know how I love pictures, I have put this tutorial into a PDF file for you to download. That way you can always save it on your computer so you'll always have it with you and you won't have to search for it when you need it again.


Monday, August 11, 2008
Offline
I wasn't able to post on here for awhile because for whatever reason Blogger identified this blog as a spam blog. I had heard that they were having problems with this, but I thought things had gotten fixed. Apparently, not. Thankfully, this blog has been cleared of all charges and is back up and running. I'll be back tomorrow with Tutorial Tuesday. Have a great day!
Monday, August 4, 2008
Organization
When it comes to digital scrapping, organization is key. In order to find what you are looking for, you need to know where to find it. This post will show one way to organize your stuff. This is how I do it.
 Let's look at the Pictures section first. Obviously, this is where I keep all of my pictures. I have many folders for all of my pictures, but below are the ones for my children.

 Inside each of the age folders are more folders and single pictures. For events with many pictures I create a folder of it. Below are, again, for Alayna (Year 8). The folders, which are hard to read, consist of her 8th Birthday, Christmas 2007, Halloween 2007, etc. For the single pictures, in order for me to remember when they were taken I have dated them and numbered them in order. So, the first single picture was taken December 8, 2007, therefore I have dated it 120807 (mmddyy). Then I put in an underscore and number it (_1). I do it that way so I can put more than one photo for a specific date.

That about sums up the Pictures portion of the organization process. Next, we'll go back to the beginning but explore the Scrapbooking side of things.
 In the Scrapbooking folder, I have two folders shown below. We'll start with the My Stuff.

I have an external hard drive where I keep all of my scrapping stuff and pictures. I spent several months last year scanning in all of my photos from years past, before I got my digital camera. It was a difficult task, but now I have everything on my computer for easy access. On my external drive, when I first turn it on, this is what I see:
 Let's look at the Pictures section first. Obviously, this is where I keep all of my pictures. I have many folders for all of my pictures, but below are the ones for my children.
In each of my children's folders are other folders organized by ages. Here are just a few of them in Alayna's folder.
Inside each of the age folders are more folders and single pictures. For events with many pictures I create a folder of it. Below are, again, for Alayna (Year 8). The folders, which are hard to read, consist of her 8th Birthday, Christmas 2007, Halloween 2007, etc. For the single pictures, in order for me to remember when they were taken I have dated them and numbered them in order. So, the first single picture was taken December 8, 2007, therefore I have dated it 120807 (mmddyy). Then I put in an underscore and number it (_1). I do it that way so I can put more than one photo for a specific date.
That about sums up the Pictures portion of the organization process. Next, we'll go back to the beginning but explore the Scrapbooking side of things.
In the Scrapbooking folder, I have two folders shown below. We'll start with the My Stuff.
This folder is where I keep all of the stuff that I make, like layouts. Again, I have a folder for all of my children and the layouts that I do for them. I also have some other folders for Avatars, Blinkies, Sigs, Cards, etc.
 There's really not much to the My Stuff folder so we'll look into the Scrap Downloads folder. I have many folders under this category. Below are the folders that are under Scrap Downloads.
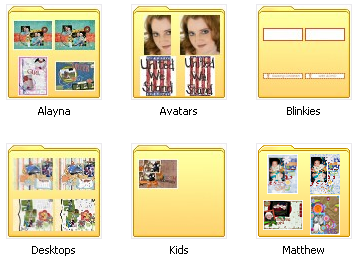
 In each of these folders, except for the Elements folder, are individual folders with the actual product. The Elements folder is so general that inside it contains several more folders, which are shown below. Now, it's not a very big picture here, but if you click on the picture a bigger one will appear. Inside each of these folders are the individual product folders.
 Let's take a look at an individual folder. This one is for a kit called Urban Jungle. Inside this folder are each individual piece (some pieces shown in the next photo here). I do want to point out a couple of very important parts to the individual folders. When the products are downloaded, they usually automatically download into a folder. On rare occasions they don't have you have to create a new folder to place all the pieces into. After the folder is downloaded, in order to remember where I got the product, and to give credit where it is due, I rename the folder to include the website where I downloaded it from.
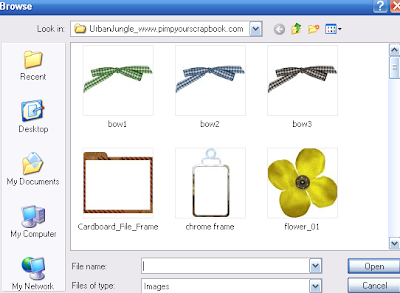
 I like my folders to look nice. In order to see what is inside of them, I have the picture of the folder as the preview that was downloaded with the product. To do this you 1) Right click on the folder, 2) click on Properties, 3) click on Customize, 4) click the Choose Picture button (when you do this, the below picture will pop up), 5) choose which picture you want to use, 6) click Open, 7) click Apply, and finally 8) click OK.
I hope that you have enjoyed this organizational tutorial. I know that it keeps all the stuff that I have just a mouse click away.
 There's really not much to the My Stuff folder so we'll look into the Scrap Downloads folder. I have many folders under this category. Below are the folders that are under Scrap Downloads.
 In each of these folders, except for the Elements folder, are individual folders with the actual product. The Elements folder is so general that inside it contains several more folders, which are shown below. Now, it's not a very big picture here, but if you click on the picture a bigger one will appear. Inside each of these folders are the individual product folders.
 Let's take a look at an individual folder. This one is for a kit called Urban Jungle. Inside this folder are each individual piece (some pieces shown in the next photo here). I do want to point out a couple of very important parts to the individual folders. When the products are downloaded, they usually automatically download into a folder. On rare occasions they don't have you have to create a new folder to place all the pieces into. After the folder is downloaded, in order to remember where I got the product, and to give credit where it is due, I rename the folder to include the website where I downloaded it from.
 I like my folders to look nice. In order to see what is inside of them, I have the picture of the folder as the preview that was downloaded with the product. To do this you 1) Right click on the folder, 2) click on Properties, 3) click on Customize, 4) click the Choose Picture button (when you do this, the below picture will pop up), 5) choose which picture you want to use, 6) click Open, 7) click Apply, and finally 8) click OK.
I hope that you have enjoyed this organizational tutorial. I know that it keeps all the stuff that I have just a mouse click away.